Chiptuning Reseller Backend
Go to the Chiptuning Reseller Backend Portal Go there
Welcome to ChiptuningReseller
We are happy to have you on board! You have chosen to use our Whitelabel Fileservice Portal.
What will happen next?
We will ask you for several data, including your domain name, logo, colors, fonts etc.
You will have to register a domain name BY YOURSELF, may be chosen freely and it's up to you which domain name you are going to use for your project.
Usually, the Fileservice Portal is put on a subdomain, for example if your domain is websitename.com, we mostly host the Fileservice Portal on fileservice.websitename.com or some other logic name like portal.websitename.com.
1: Add DNS entry to your hosting
You will need to make DNS settings to make sure the subdomain points to our servers, the IP address for this is 136.144.213.251
- Login into your hosting environment
- Add a DNS A-Record, for example fileservice and point it to this IP addres: 136.144.213.251
- Make the TTL short, so it will be updated soon, something like 300 seconds is fine (5 minutes)
2: Add MailJet DNS settings
We use MailJet as our mail service provider, this is because MailJet makes sure that email will arrive and will not be marked as spam. Before we can use this however, MailJet must be allowed to send email through your domain. There will be additional DNS settings needed. This is unique for each website, and we will send you the data once ready.
3: Send us as much info as possible and prepare your Terms & Conditions
Send us all the info we might need, for example:
- Font types used in your site
- Colors that we must use
- Logo
- Background-images for login screen (if none provided, standard will be used
And please make sure you create a Terms & Conditions file we can use to show to your customers before they can upload or buy credits.
Next Steps
After completing the first payment, we will set up your own environment and send you the credentials. Then you will need to do some stuff yourself. Make yourself familiar with our portal, click and scroll around.
Before you can use the Chiptuning Reseller portal there are a few steps that need to be completed:
- DO THIS FIRST: Check portal settings (! important !)
- Check your payment gateway settings
- Set up tuning types
- Set up products
- Do a test registration
Dashboard
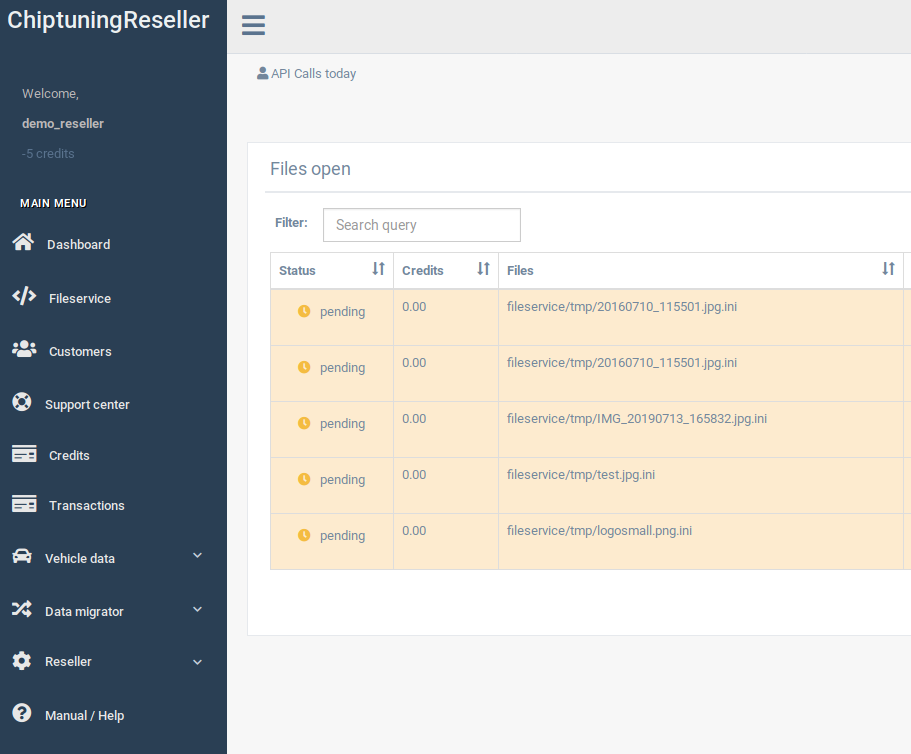
here you will find an overview of files that are waiting for your actions.
Click on a file action to go to the file exchange screen and send your customers files
Fileservice
Probably the most important part of the platform. Here you can see all files that are open and files that have been completed.
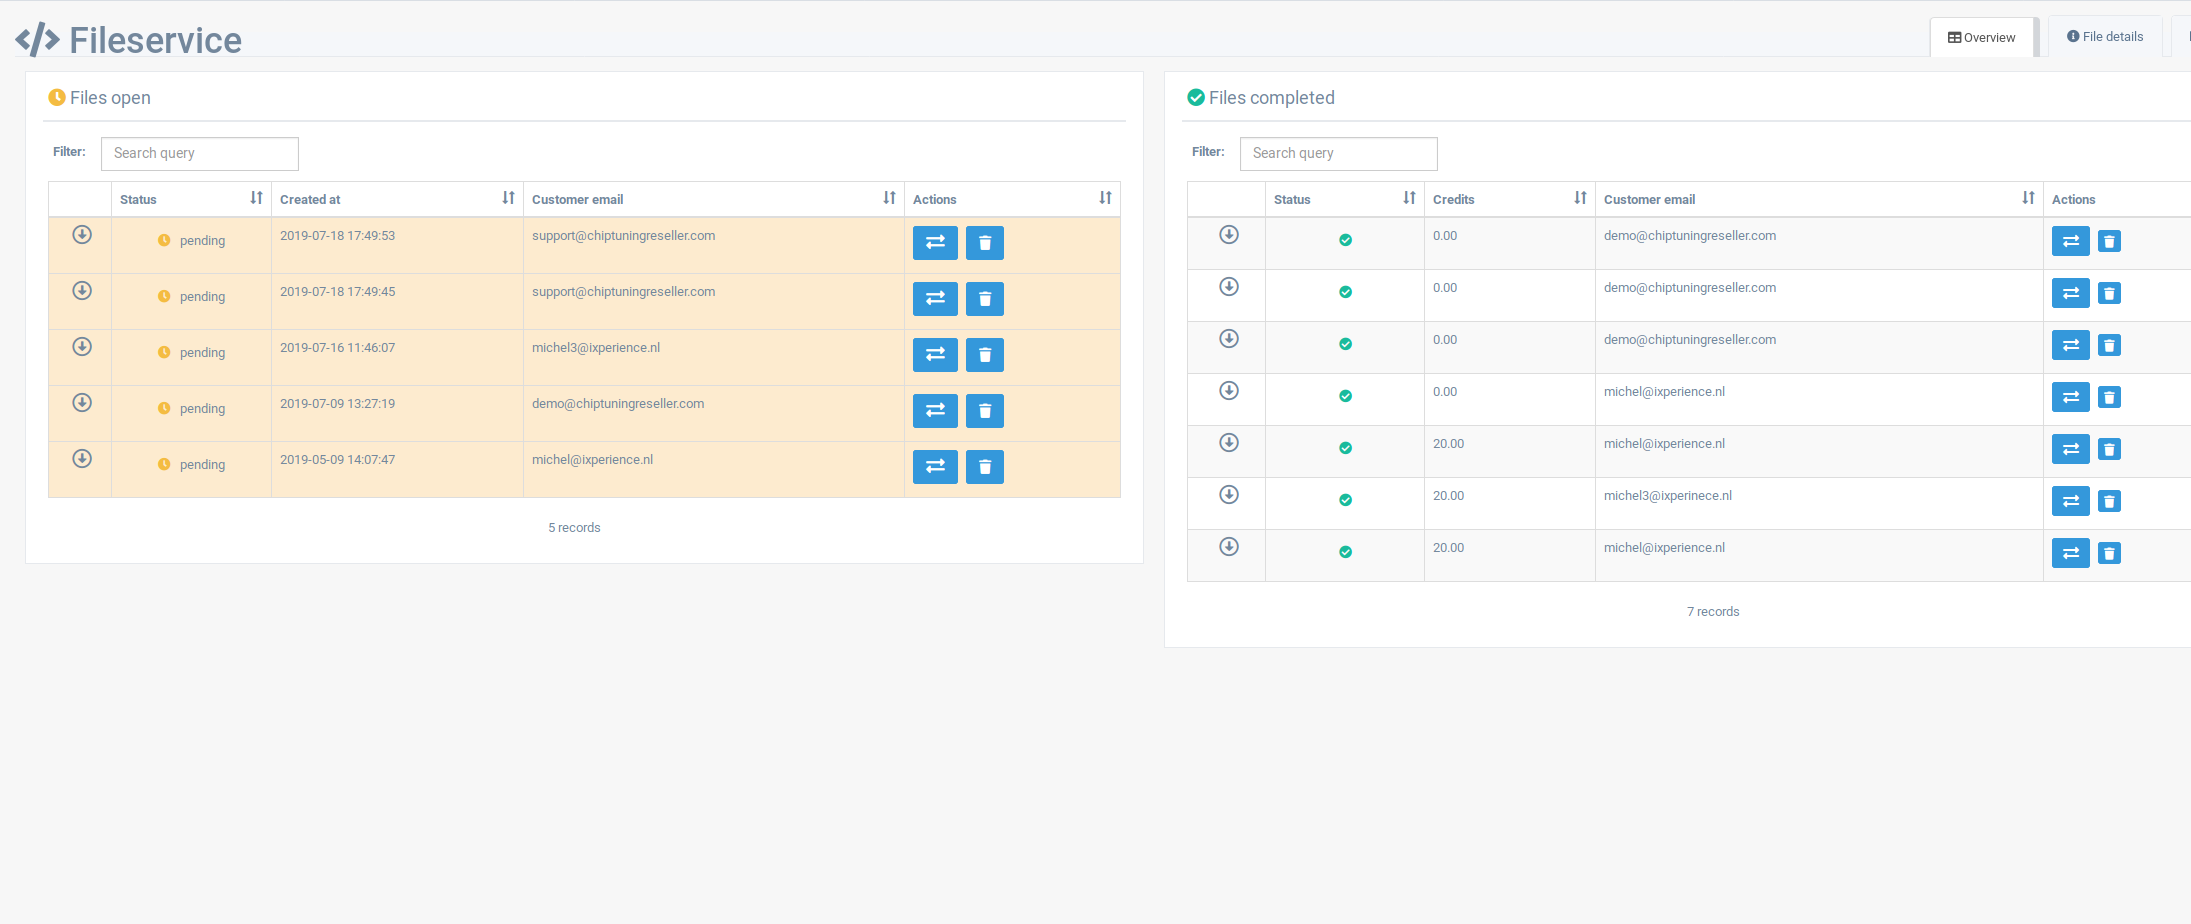 Files on the left are waiting for your response. Files on the right have been completed already. You can find files by entering data in the search fields above the tables. You can search for values within the table such as email addresses or file names.
- Click on the file exchange icon to go to the file details and upload a file back to the customer
- Click on the trash bin to remove the file
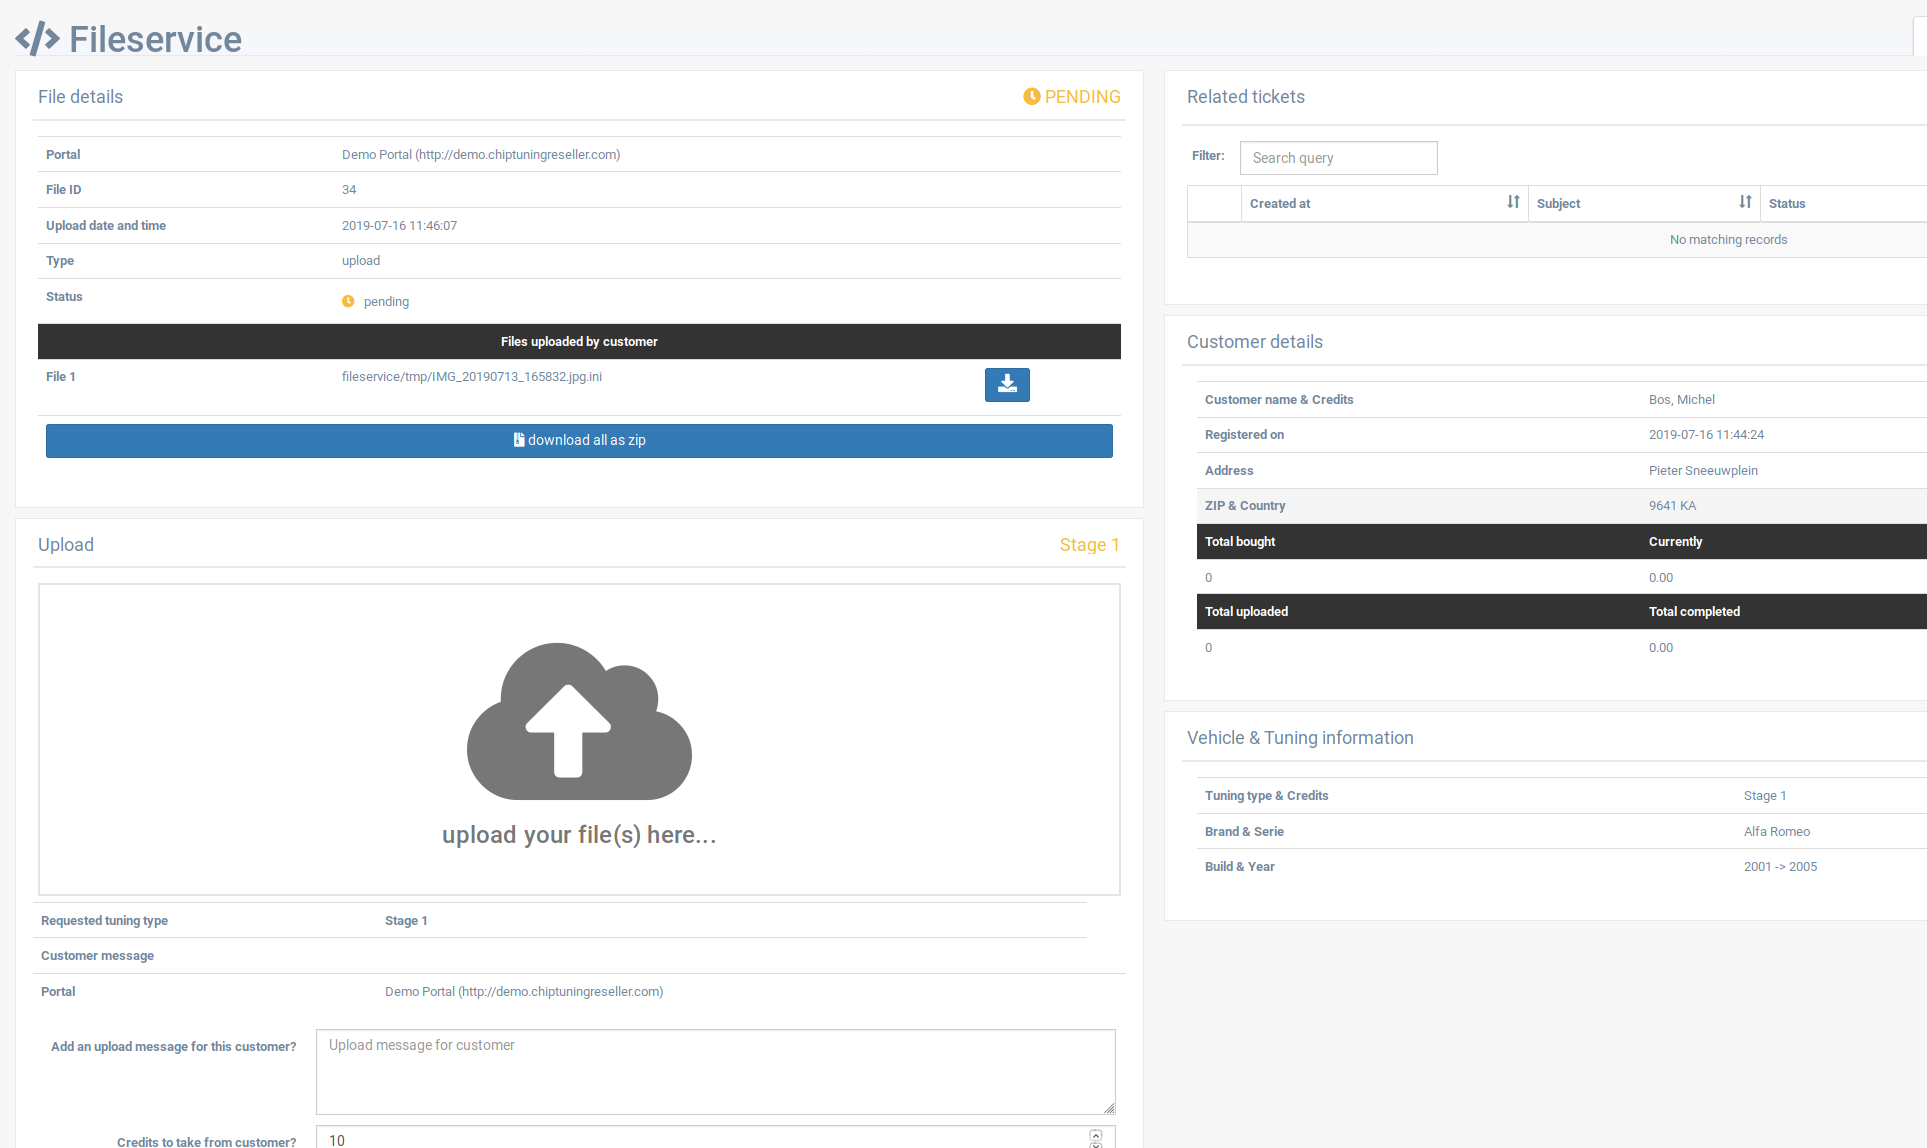
Fileservice Details
In this screen you can exchange files with your customer. A customer uploaded a file to your portal and expects a file back from you.
- You can upload multiple files at once by dragging and dropping or using the file selection method to grab multiple files
- Uploading will continue while you're typing or adding details
- When the uploading is completed you will be notified and you can click Upload
- After the processing completed, you will be guided back to the overview screen. Notice that the file has moved from the left to the right table
Assigning files
In our system you can also assign files to other colleagues. This is handy when you are working with a team of developers. To assign a file to yourself, click 'I am working on this file' on the right corner of the screen. To assign the file to a colleague, click the arrow button next to the blue button. Then select the correct colleague. You can also add a message - do this before you assign the file.
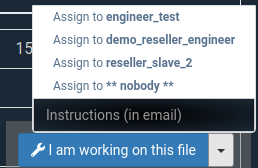
Note: if you have a file you cannot do and needs to be done by someone else,
then assign the file to ' nobody '.
Customers
To be able to manage customers in the portal, click Customers in the main menu. You will be presented an overview of your customers. To view details of a customer click the pen button next to it. The customer detail screen will open.
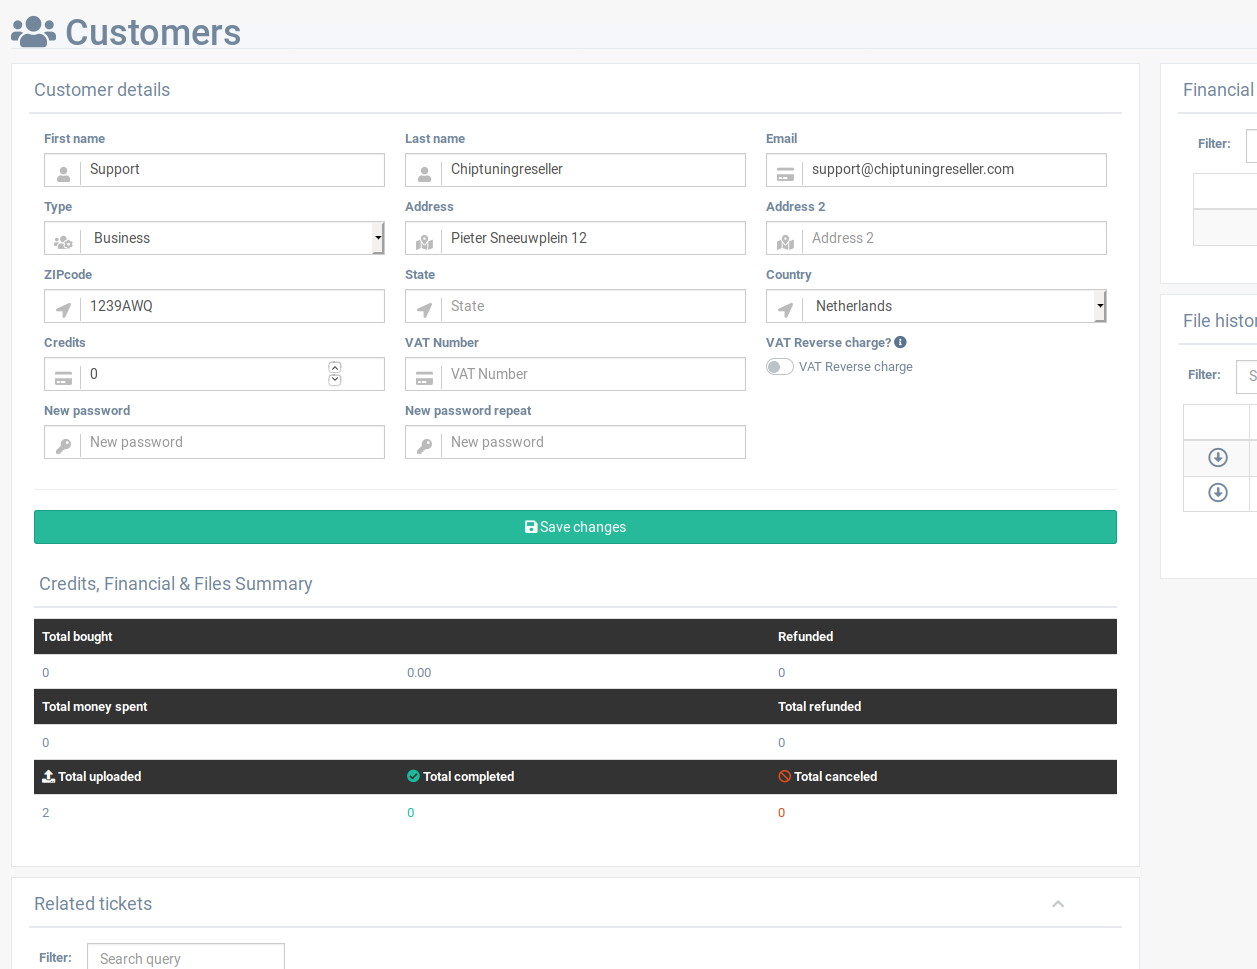
In the customer details section, you can edit almost all customer settings.
- Name and email details
- Type: business or Individual
- Address settings
- Credits: Enter a new value to change this - a registration of this will be made in the system
- VAT number & VAT Reverse Charge: Make sure this is entered correctly for your administration
- Password: Enter here to change the password on saving
Furthermore, you can see the related tickets to this customer and his financial and file history.
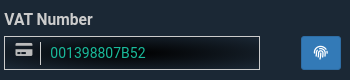
Also, you can check wether a customer has a valid VAT number (checked by the European Unions' VIES register) by using the button next to the VAT number. Please mind: always enter the VAT code without the country code!
Customer Groups
You can also make groups of customers. This is useful if you have multiple regions of customers. You can then limit specific products to customer groups. For example, you can add discounted products for certain groups.
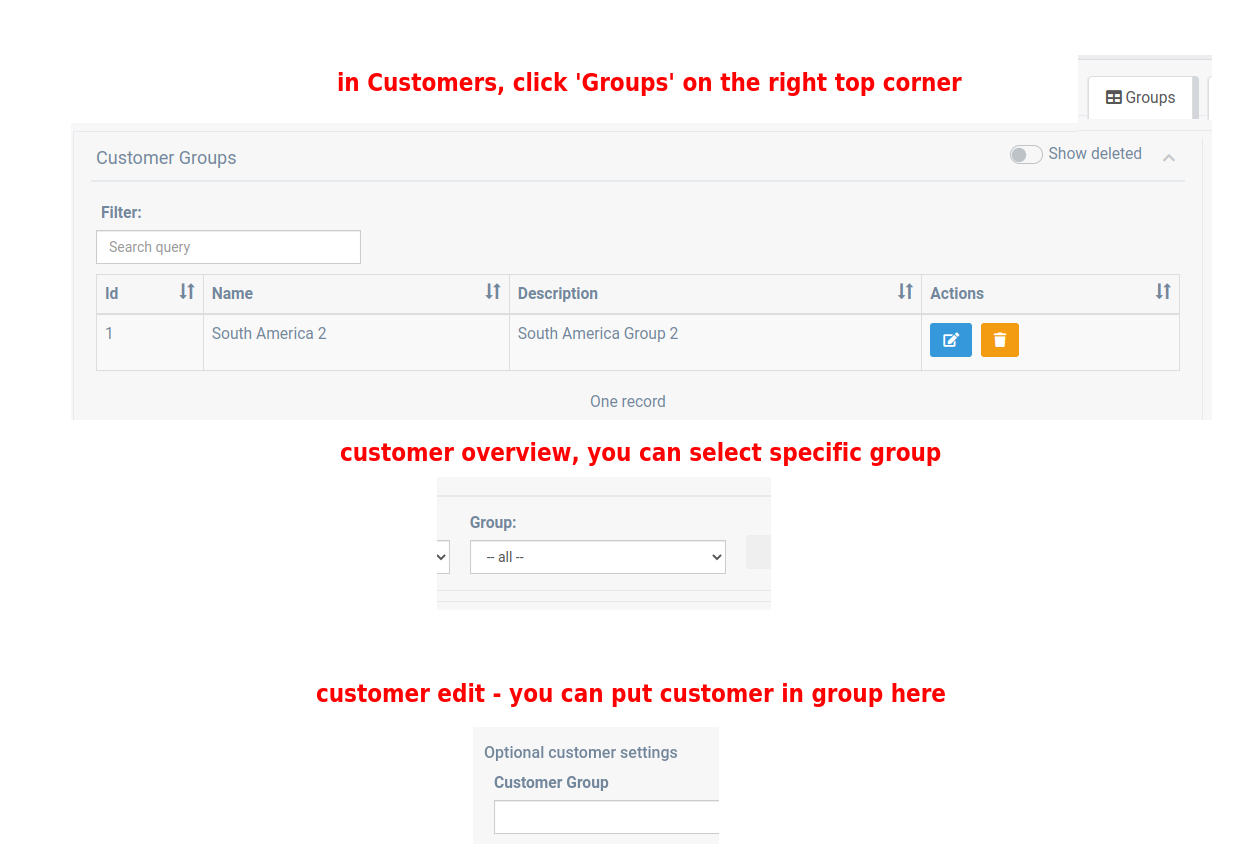
You can manage customer groups in the Customer Overview and then click 'Customer groups' on the right top corner.
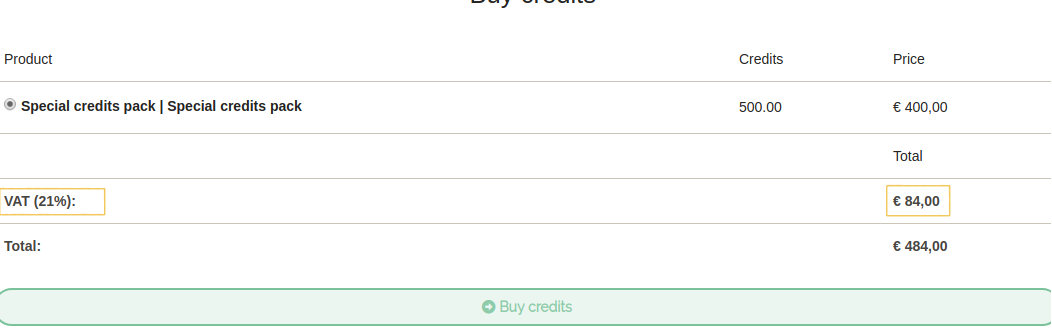
VAT calculation
The portal is able to charge VAT to customers who are not VAT reversed. If you have a product with for example 21% VAT, this will automatically be added to the prices if a customers wants to buy credits. Make sure you set the CORRECT VAT settings per customer, check their VAT numbers if needed. This is your own responsibility.
Portal specific VAT settings
To set up global VAT settings per portal, you can go to 'Portals' and then select the 'Portal' you want to edit the VAT settings for.

This way, you can define a global VAT setup for each portal.
- Default (depends on VAT number / Reverse charge): This will charge VAT if a customer has NO valid VAT number, or do VAT REVERSE CHARGE when a customer HAS a valid VAT Number (Please mind: if you are a EU customer, the system will NOT charge VAT for customers OUTSIDE EU)
- Only charge VAT INSIDE the portal's country : VAT will only be charged for customers in the same country as the portal's country
- NEVER charge VAT: VAT will never be charged (always 0%)
- ALWAYS charge VAT: VAT will ALWAYS be charged as set in portal OR per product
Important: VAT percentagesettings in products always OVERRULE the default VAT percentage.
Checking the validity of VAT numbers happens in the VIES system of the EU (https://ec.europa.eu/taxation_customs/vies/)
Support system
Chiptuning Reseller contains an extensive ticket support system that you can use to help your customers. Click Support Center in the menu to open it.
Create a new ticket
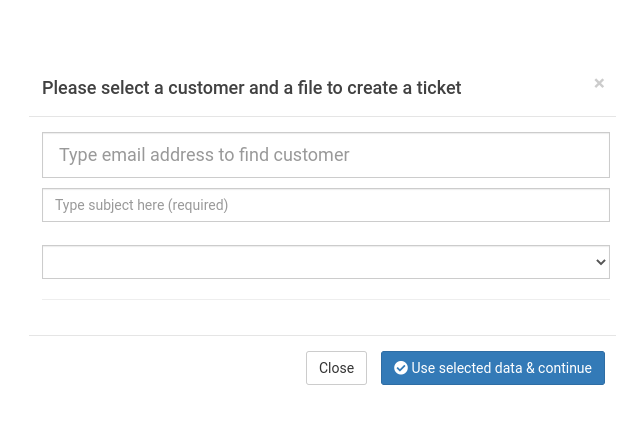
To create a new ticket that you send to a customer, click Create on the right top side of the Support center. Enter the email address of the customer. If you don't know it, you need to go to the customer overview and click there to create a ticket for a customer. A subject is required. You can select - No File - to create a ticket that is not referenced to a file.
After clicking on the Use selected data & continue button, you will be taken to the Ticket Details screen. Here you can set up the message for your customer.
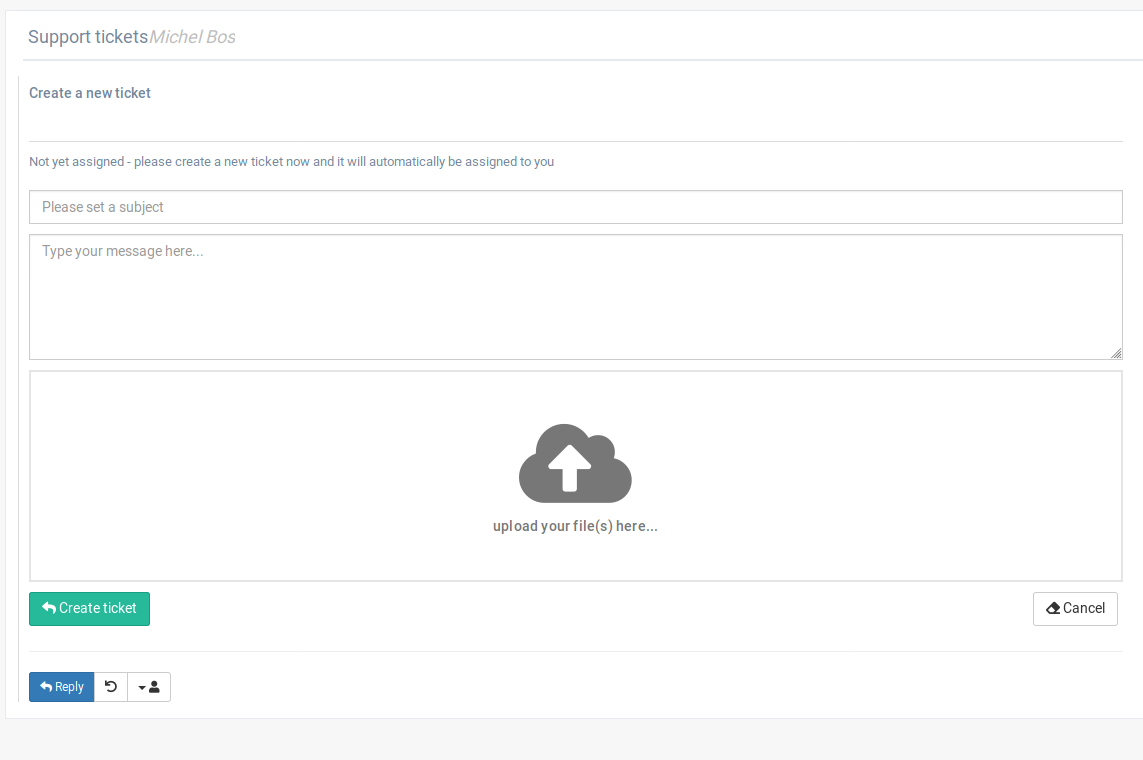
You can also add files here if needed. If you've entered all data, you can just click the submit reply button to send the message to the customer.
Ticket details
Once a ticket has been made by either you or your customer, you can view it's details. Click the pen icon next to a ticket to edit it. The details of a ticket will show up as a conversation display. On the left you see the message buttons with their titles. Click on one to open it's details. There are a few options here:

- Reply button: Reply to the current ticket instance - the text fields will open
- Assign to another user: If you think this ticket isn't for you, you can assign it to a different colleague
- Mark unread: Mark this ticket as unread to make it lighten up again
To close a ticket, click Close case or to successfully finish it, click Finish case. The ticket will go down to the overview.
If you want to view the file details, you can click the button on the right. This will take you away from the current ticket and you need to search for it again.
Credits
Click on Credits in the main menu. The Credit overview screen will open.

When customers buy or spend credits you can see the transactions here. If you click the exchange button, you can see the details of a credit-transaction. If you want to roll back an credit action, click the rollback button. The credits will be either given back or taken from the customer. Please be careful with this functionality.
Transactions
See financial transactions between your customers and you. If a customers buys credits for example, you can find the corresponding transaction here. To view details of an invoice, just click the exchange button and the information will appear. To download the PDF invoice, you can just click the PDF button. You can also re-submit the invoice to your customer via email. To do this, click Submit invoice to customer via email.
Portals
To be able to use the Chiptuning Reseller system, you need to have portals set up and ready. With portals you can attach one or more websites to the Chiptuning Reseller system, which makes it easy for you to do business for multiple websites in one place.
Click on Reseller and then open the Portals page. You will see the portals that are installed for you. Is a portal missing? Please contact your account manager to have it set up!

Portal message
If you want to show your customers an important message, for example, your openingtimes are limited due to holidays, you can click the 'Message' button in the Portal Overview. There you can add a message and also a date from / to when it should be displayed. You can also clear the message by pressing the delete button next to it (if applicable).
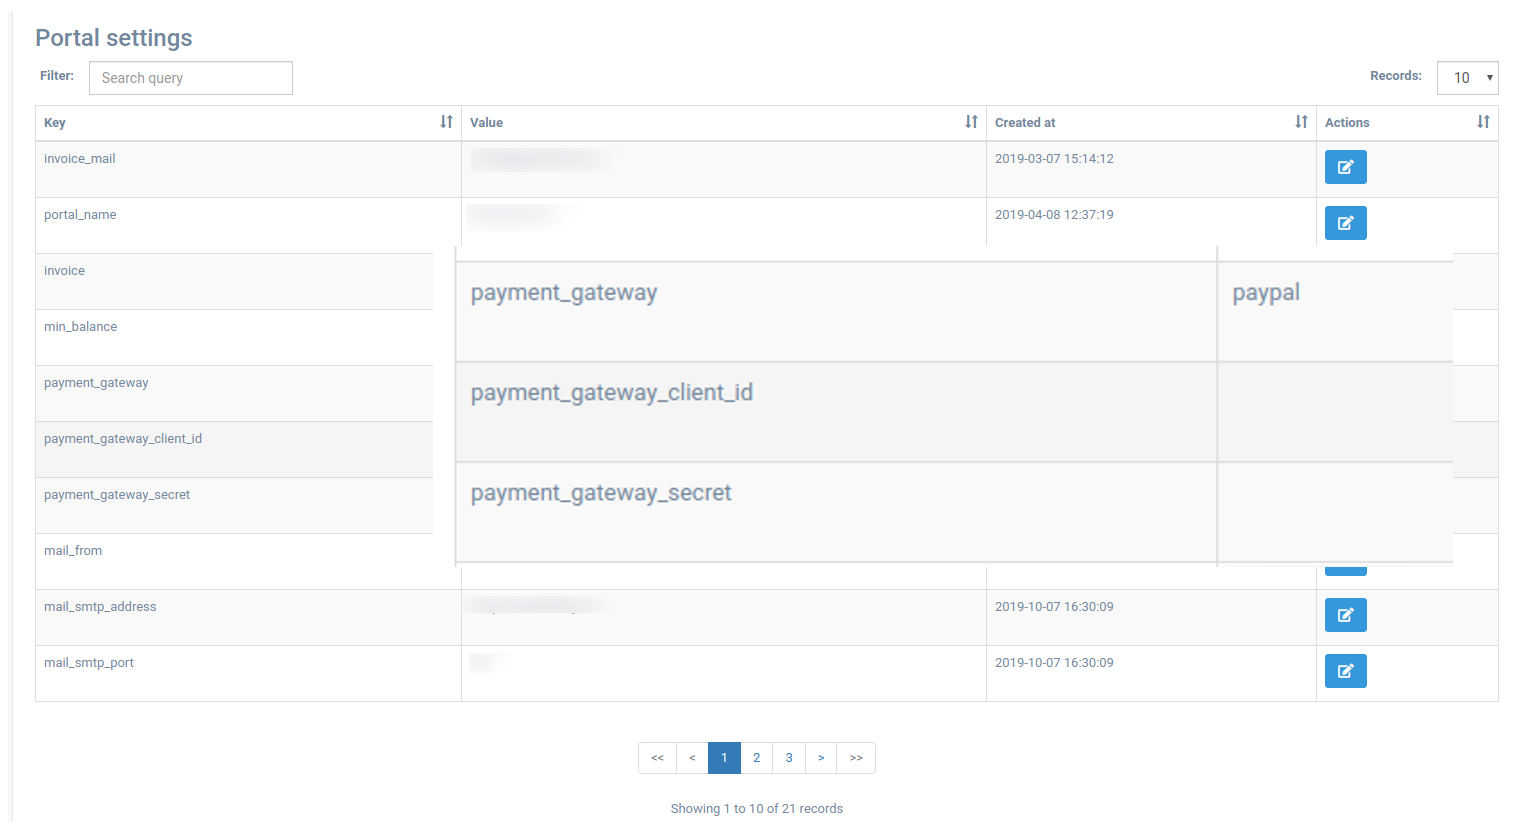
Portal settings
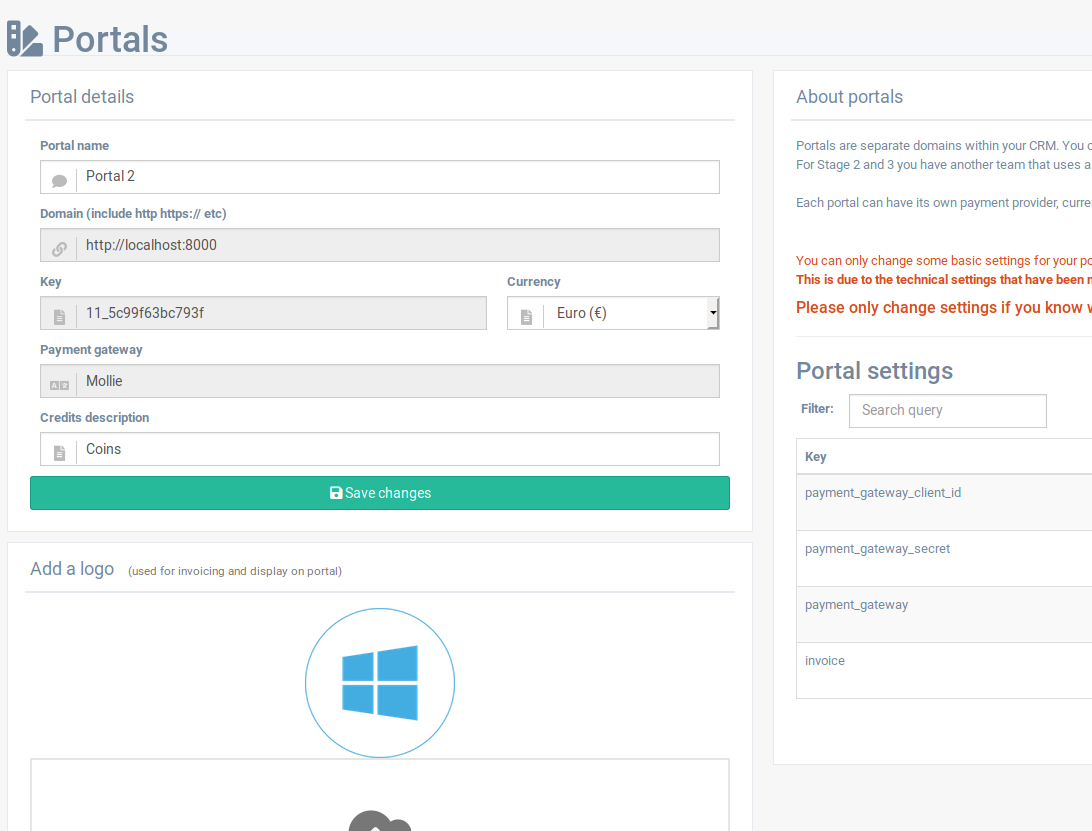 In portal settings you can change various important settings for your website (portal). The following info is editable:
- Name: The name that will be shown to customers and all other communication
- Currency: The currency that you will work in (this will also show up in invoices)
- Payment Gateway: The payment gateway being used. This can only be changed by CTR Admins.
- Credits description: If you work with a different name for credits, enter it here
- Logo: You can upload a logo that will be shown on the portal and invoices
Depending on your settings you can see other portal settings on the right in the table. Please take great care in editing them, as this can result in a unusable portal. Ask your account manager for more information. There are also HTML pages in these settings. If you're sure of what you're doing, copy the value to a HTML editor (Dreamweaver for example), edit the values there and past it back into the text field.
Payment Gateway Settings
Depending on your preferences you can have different payment gateways that your customers can use. In the portal details section you can change the keys for your payment gateways. Please only change this when you know what you're doing. If you need help, just ask your account manager. If you're using PayPal,
If you're using Stripe,
Email Settings (Very important!)
To make sure your emails are being delivered to your customers, it's very important that your email settings are entered and checked valid.
- mail_from: The email address you want to show the customer where your mail is sent from (for example noreply@mysite.com)
- mail_smtp_address: The SMTP mail server (for example smtp.mailtrap.com)
- mail_smtp_port: The SMTP port your mail should go through. (for example 587 or 25)
- mail_smtp_username: Your SMTP username (for example yourname@domain.com)
- mail_smtp_password: Your SMTP password (for example myPassWord#Here)
- mail_notifications: Where you want file upload notifications (and other notifications) go to? VERY important!
The above settings are very important! After changing, please check your email with the 'Test Mail' functionality.
To do this, just enter your own email address in the text box underneath the settings and click Send test email.
If the system says success and you receive the email, everything is ok. If it gives an error and you can't get it to work, contact your account manager, as this is preventing customers from using your portals!
Important! ADD SPF TO YOUR OWN SERVER
Sender Policy Framework (SPF) is an email validation system designed to prevent email spam by detecting email spoofing, a common vulnerability, by verifying sender IP addresses.
If you do not have a SPF record, please add the following one to your domain:
v=spf1 a mx ip4:149.210.148.113 ~all
This is very important, because this makes it possible for our application to send emails on your behalf of your own website. Customers won't see that it is sent by our system this way.
Products, Tuning Types and Credits
 In Chiptuning Reseller, Products, Tuning Types and Credits can be managed from one screen.
To be able to do business your customers must be able to buy credits, and select various tuning types. You can manage these by clicking Reseller and then click Products.
In Chiptuning Reseller, Products, Tuning Types and Credits can be managed from one screen.
To be able to do business your customers must be able to buy credits, and select various tuning types. You can manage these by clicking Reseller and then click Products.
There are multiple types of products:
- Chiptuning: Products in this category can be chosen as tuning type (stage 1, stage 2 etc)
- Tuning Hardware: If you sell tuning hardware, you can add it here. The tuning hardware webshop will be available at a later moment
- Credits: These are the items customers can actually buy to be used for tuning files
- EVC Credits: Customers can also buy EVC Reseller Credits - you must have your EVC ID entered in the platform and only customers with valid EVC number can buy these credits
Edit Product / Tuning Type / Credit Details
To add a product, click the Create button on the right top, to edit a product click the edit button next to a product. It will open the details screen. You can edit the following details:
- Parent or Child product: Child products will not be shown as normal product
- Short name: This name will be displayed as a clickable item for the customer
- Long name: This will be shown as description or extra text
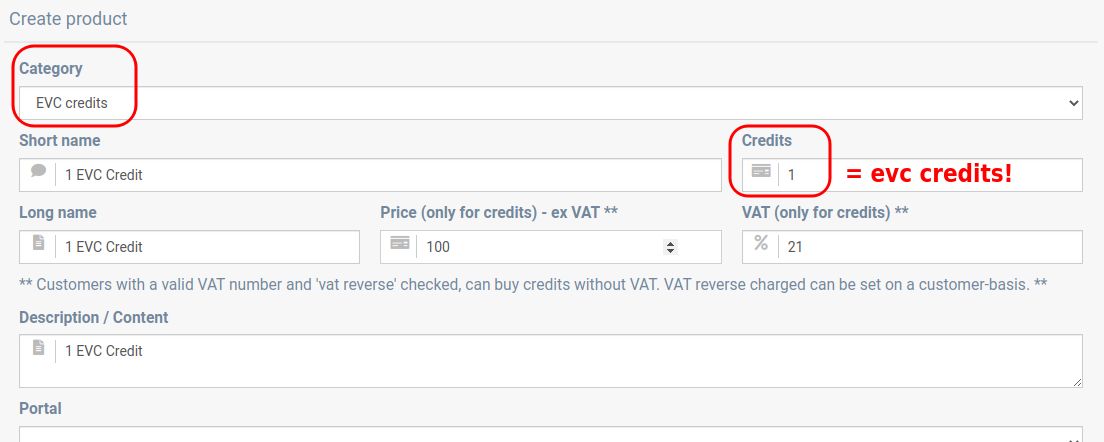
- Credits: The amount of credits you want to charge for this product
- Amount (only for purchaseable credits): The amount in the set currency you want to charge for this item
- VAT (only for purchaseable credits): The VAT amount for this product. You can set VAT eligible for a customer in a customers' details
- Category: The type or category of this product. Select 'credits' to be able to set the amount, select 'chiptuning' to add a tuning type
- Vehicle type: (when selected category is Chiptuning) the vehicle type this product applies to
- Portal: The portal (website) you want this product to show up
- Files: You can attach files or images here for extra information
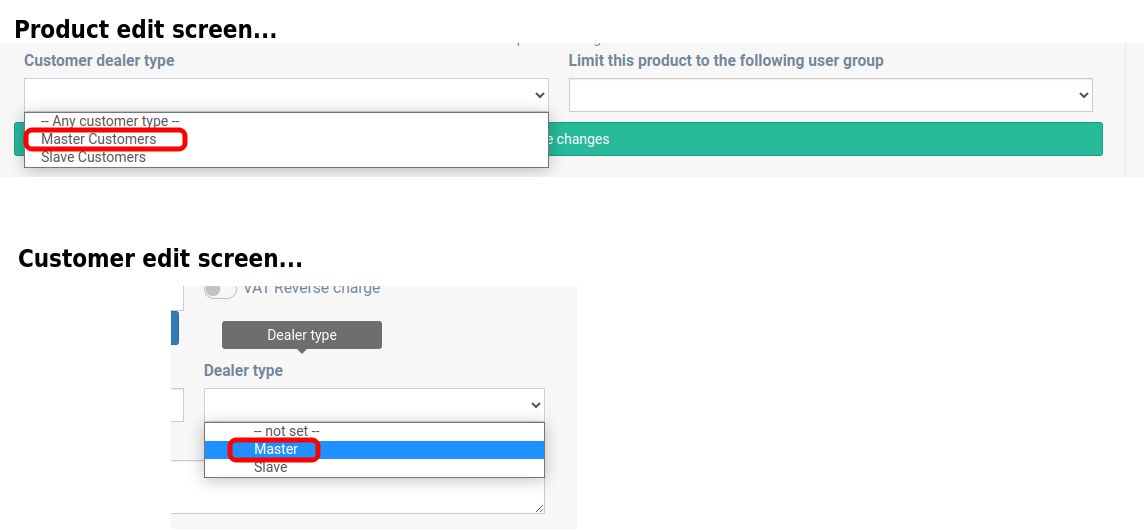
- Optional customer dealer type: You can show this product to only master or slave dealers
- Limit to user group: Only show to customers in specific user group
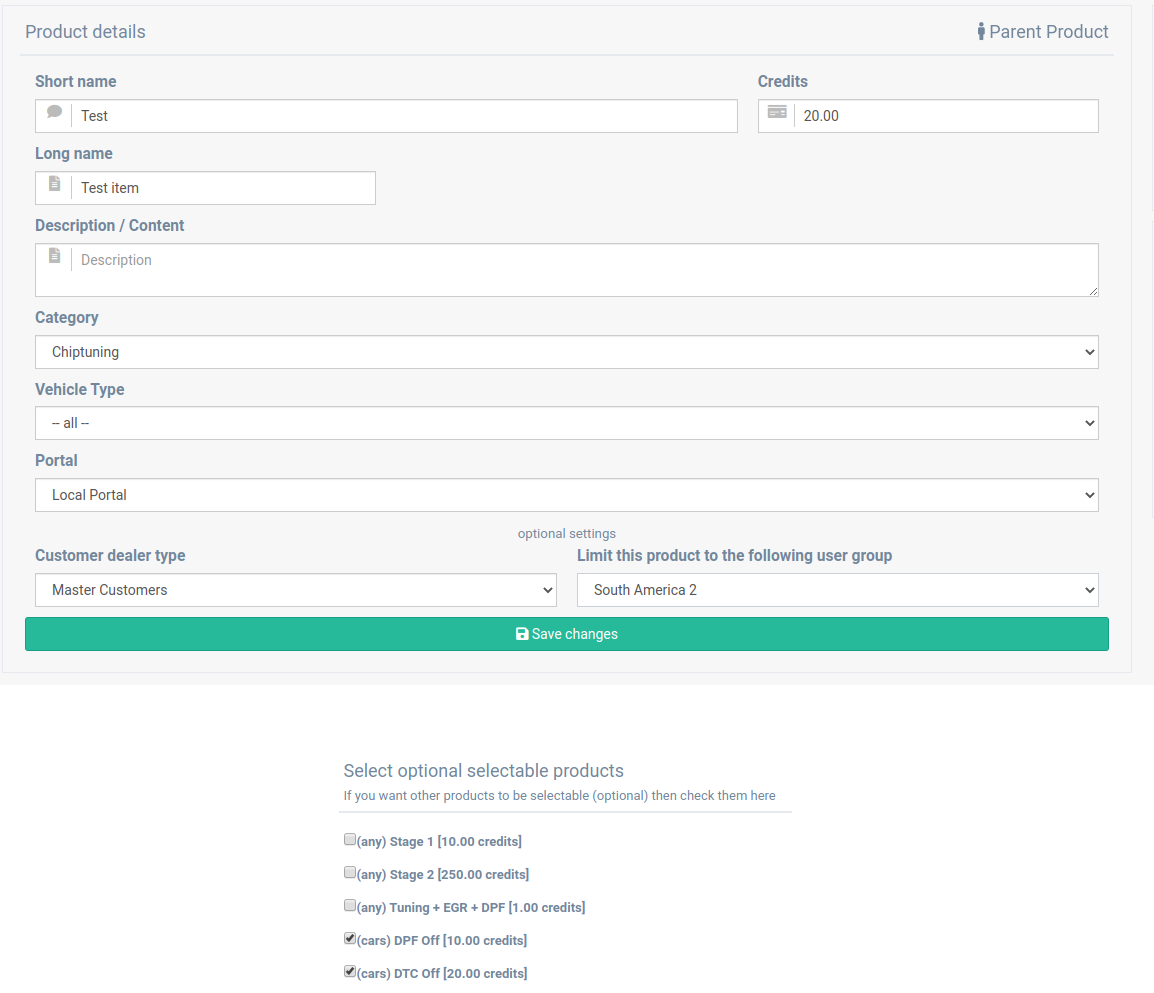
You can add additional tuning options to a product by checking them in the section of 'Select optional selectable products'.
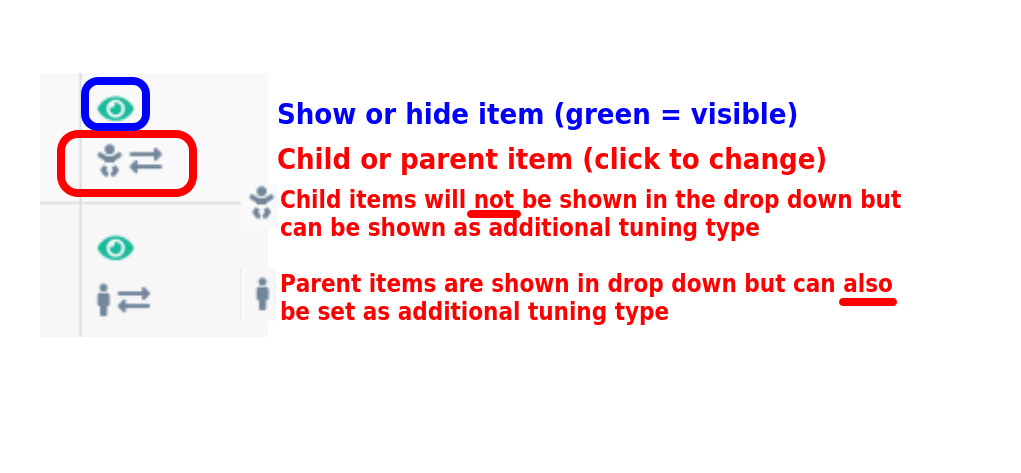
With these items you can setup your inventory and available tuning types. Ask your account manager for more information if needed.
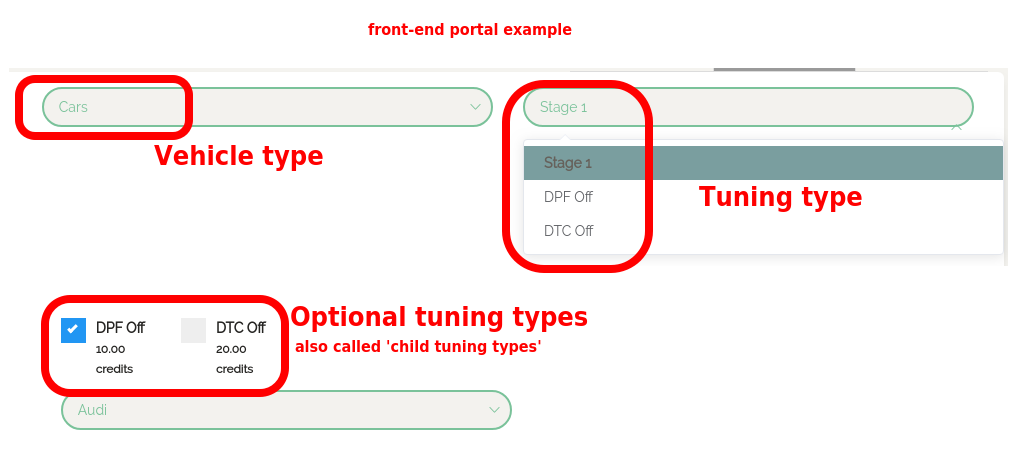 The above picture shows the tuning types for 'Cars' (this is the customer front-end portal). The additional tuning types can be checked by the customer upon request.
Important: if you have MASTER or SLAVE customers, make sure you have some products shown to certain groups, because otherwise these customers WILL NOT see ANY products!
Making a test registration
To make sure everything works as you want it to, you should make a test registration on the portal you want to run live. To do this, go to your test portal, for example https://demo.chiptuningreseller.com (or whatever you set as your portal URL). Now, click 'register' to create a new account
- Enter the details in the first screen as you see fit (email, firstname, lastname and address line 1 are required)
- Click next and enter the company details as well - VAT numbers are important if you want to be VAT reverse charge eligible
- When all done, enter a suitable password, check the accept boxes (check if the terms are OK) and click Register
You will receive a welcome email with details and you are able to login. Please do and check if all OK.
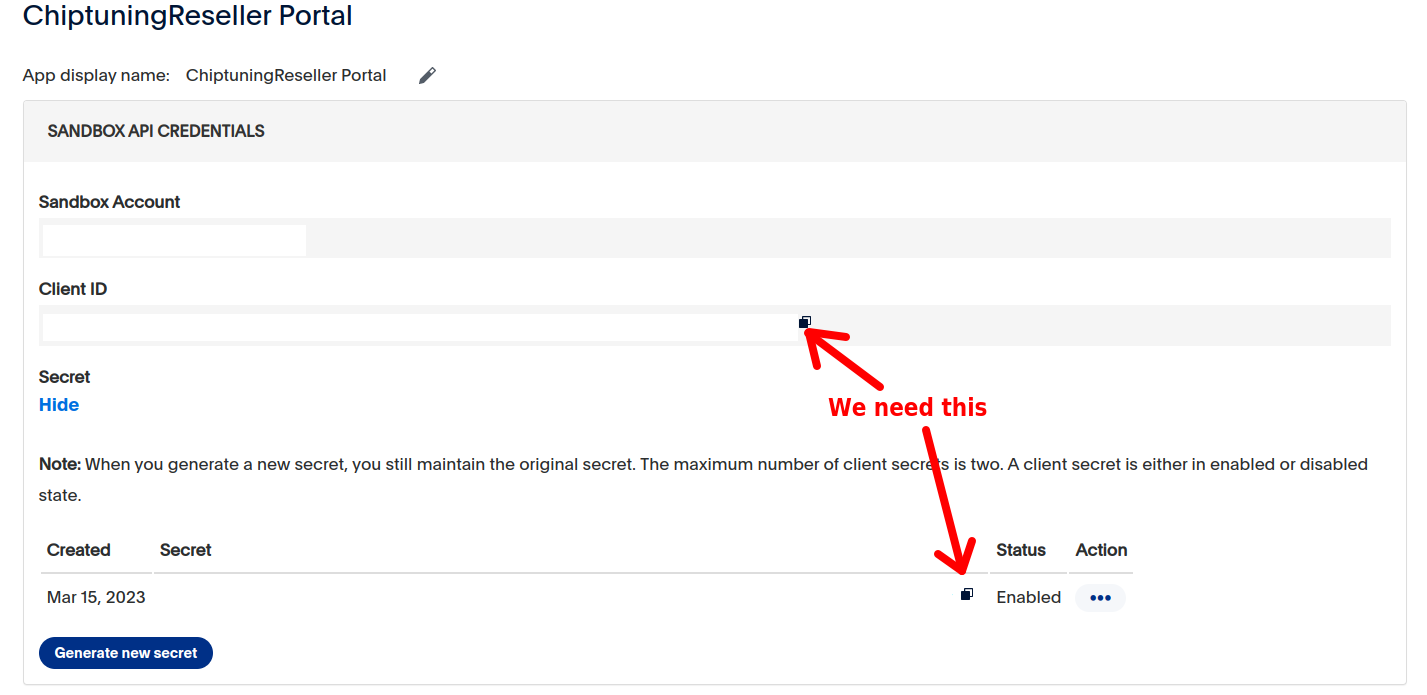
Setting up PayPal credentials
When you are using PayPal to handle payments, you need to make sure you have a PayPal Client-ID and a Secret that our application can use.
To do this, you need to have Developer functionalities enabled. Read all about creating your developer account on the PayPal website:
Click here for Developer Information
Once you've setup the developer account, create an app
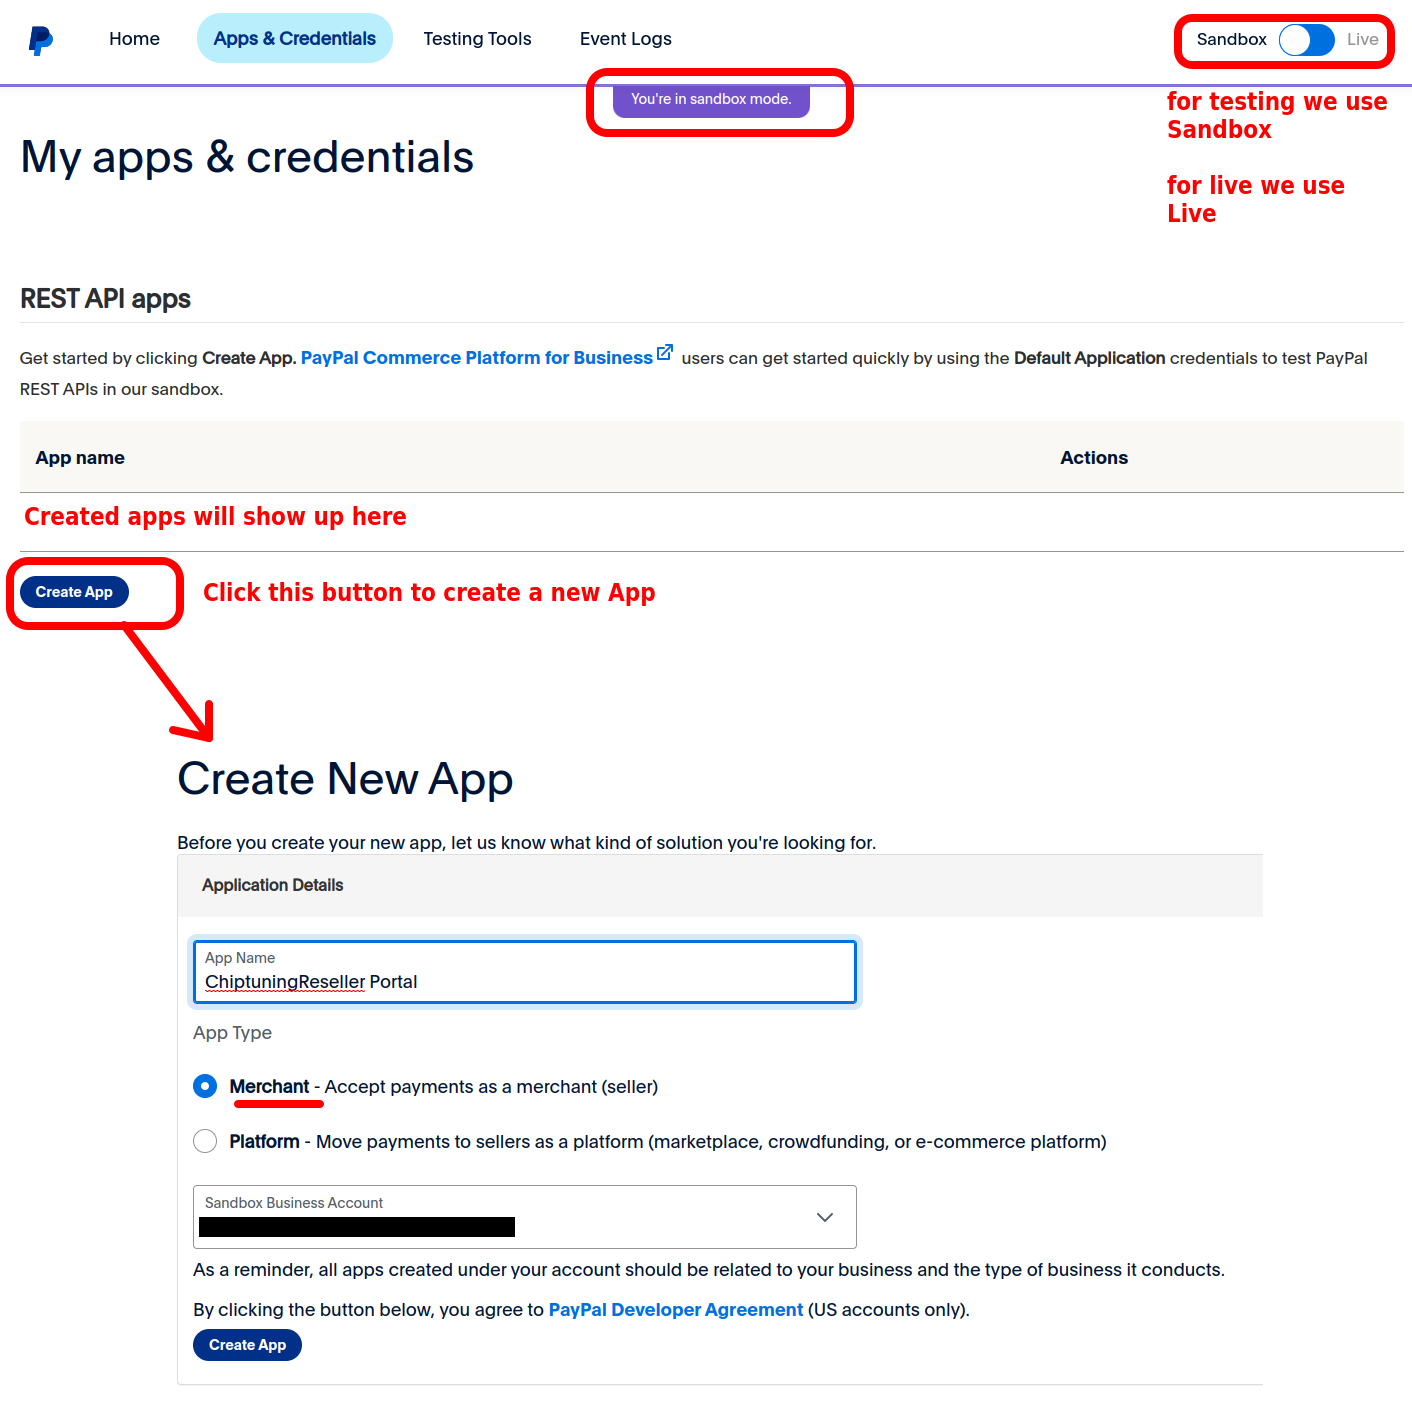
Go to https://developer.paypal.com/dashboard/applications/sandbox and click the Sandbox or Live option. In production sites, use the Live version!
Then, click Create App to create a new app. Enter a logical name (like Chiptuning Website) - in Sandbox: select your Sandbox or Live Business Account.
Then click the button Create app to create it. This will make a new app for you to be used by our application.
Remember: We need BOTH Sandbox AND Live Keys!
Additional settings
Additional settings
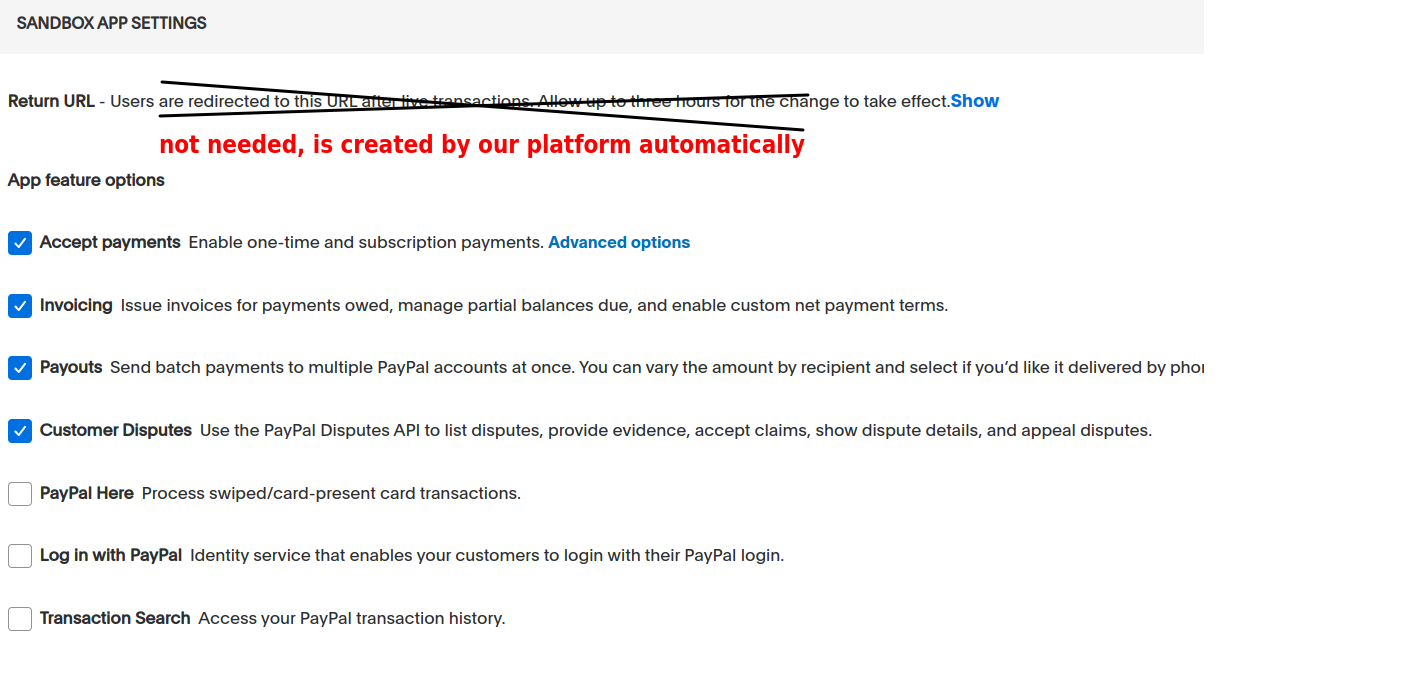
Make sure you also set up the correct webhook for your portal, so we can process asynchronouos calls from PayPal
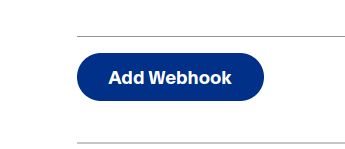
Scroll down in the web app settings in PayPal and then click 'Add Webhook'
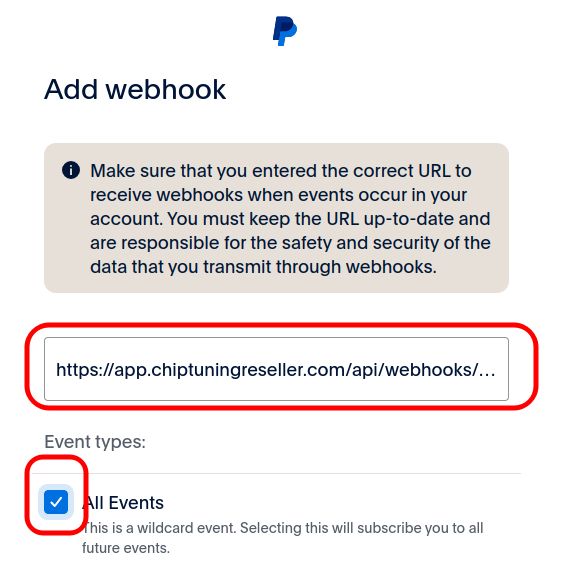
 A new popup opens, and here you'll need to enter the webhook to our systems and also add your Portal code. This code you can obtain from your ChiptuningReseller account manager.
The url is as follows: https://app.chiptuningreseller.com/api/webhooks/paypal/PORTAL_CODE (where you need to replace PORTAL_CODE with your portal code.)
It is important that the above settings are correct. If they don't work, then sometimes a payment from PayPal cannot be verified automatically. Please contact us if you need help with this.
Then click the created app, and you will see the credentials. To get the Secret just click the Show button.
Copy and paste these items to your Chiptuning Reseller Portal settings, and test them out by making a new payment (add a test product to enable a small fee only).
 If you're having difficulties setting up PayPal, please contact your account manager and we will help you where possible.
Setting up Stripe credentials
When you are using Stripe to handle payments, you need to make sure you have a Stripe Publishable Key (PK) and a Secret (SK) that our application can use.
To do this, visit the developer section of your Stripe account: Click here.
Once you've obtained your PK and SK, please send them to your ChiptuningReseller account manager so he can add them to your portal.
More instructions on how to obtain these keys on the Stripe website.
Notifications (Email and SMS)
The Chiptuning Reseller system has a wide range of Notification settings. By default, you will get emails from the system in the following cases:
- Customer uploads a file
- Customer sends or replies to a ticket
- A file has status pending for 20, 40 or 60 minutes
To be able to receive the status pending emails, you need to set it in your User Profile.
SMS
If you have a Plivo account, it is also possible to receive SMS notifications. Please set up a Plivo account and contact our support for help setting it all up.
Modules
The ChiptuningReseller platform supports multiple modules. We can create new modules upon request.
We at ChiptuningReseller do not guarantee the working of any of our modules. This is because they depend on external services.
Sell EVC Reseller Credits
The ChiptuningReseller platform supports connecting to EVC to sell EVC Credits. To do this, you must first contact EVC to request an API ID and an API Password.
After you've done this and you got the API credentials from the EVC team, go through the following:
- Click on 'Reseller' in the mainmenu
- Click on the 'Portals' submenu
- Click on the edit button next to the portal you want to enable EVC Reseller Credits Selling for
- In the Portal edit screen, click on the EVC module button
- Enter your API credentials you got from EVC
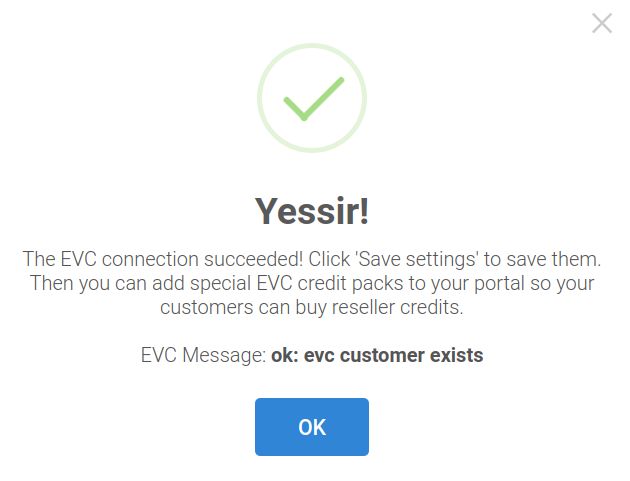
- Click 'Test connection' - if it passes, the 'Save' button will be enabled. Click it.
- Your EVC connection for this portal is active
Add EVC Credit Packs
To be able to sell EVC Reseller credits, you must add the corresponding EVC products. Follow the instructions:
- Click on 'Reseller' in the mainmenu
- Click on the'Products' submenu
- Click on 'Create' on the right top corner
- Select the category 'EVC Credits'
- Add the desired EVC credit details. Normally 1 credit is 1 file. EVC takes EUR 5 per sold file
- Important: ChiptuningReseller does NOT charge extra costs for selling EVC credits or files!
- After entering the product details, click 'Save'
Make sure customers enter their EVC number (or add it yourself)
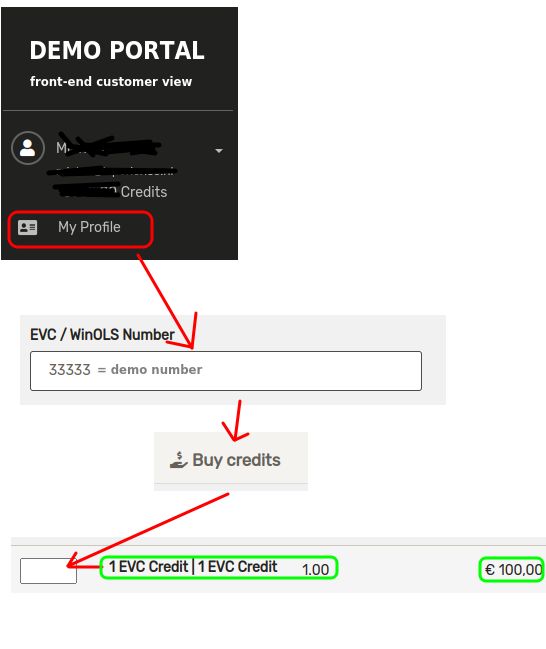
A customer needs a valid EVC number that they must enter in their profile. Depending on your front-end portal, the way this looks and works can be different.
You can also edit the customer details in the back-end and enter their EVC number there.
Edit customer EVC number in back-end
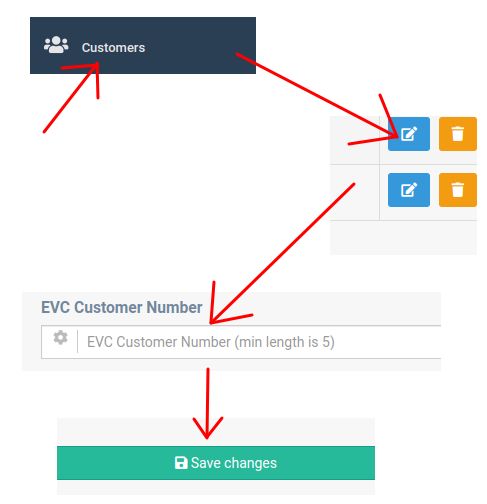
Customers can enter EVC number in their profile
We at ChiptuningReseller do not guarantee the working of any of our modules. This is because they depend on external services.
Automatic File Service
If you have WinOLS for making files and if you have a large file database, it is possible to use AUTOMATIC filesystem. Our platform can connect with your system via Dropbox, so we can exchange files between you and your customer automatically.
We will soon expand this manual with how to set-up this functionality.